Build a simple client-side MVC app with RequireJS

As a web developer, you certainly often started coding your JavaScript in a single file, and, as the code base gets larger and larger, it became really difficult to maintain. To solve this problem you can split your code in several files, add more script tags and use global variables to reach functions declared in other files. But this pollutes the global namespace and for each file an additional HTTP request consumes bandwidth, which slows down the loading time of the page.
If this happened to you, you certainly understand that there is a strong need to organize our front-end code differently, particularly if we have to build large-scale web apps with thousands of lines of JavaScript. We need a new way to organize all this mess to make it easier to maintain. This new technique consists in using script loaders. Plenty of them are available on the web, but we'll focus on a very good one, RequireJS.
In this step by step tutorial you will learn how to build a simple MVC (Model - View - Controller) app using RequireJS. You don't need any particular previous knowledge of script loading - we'll see the basics together.
Introduction
What is RequireJS and why it's awesome
RequireJS is an implementation of AMD (Asynchronous Module Definition), an API for declaring modules and loading them asynchronously on the fly when they're needed. It's developed by James Burke, and it just reach the symbolic 1.0 version after 2 years of development. RequireJS can help you organize your code with modules and will manage for you the asynchronous and parallel downloads of your files. Since scripts are loaded only when needed and in parallel, it reduces the loading time of your page!
MVC for the front-end?
MVC is a well known design pattern to organize server-side code and make it modular and sustainable. What about using it for front-end? Can we apply this design pattern to JavaScript? If you're just using JavaScript for animating, validating few forms or any simple treatment that doesn't require many lines of code (let's say less than 100 lines), there is no need to structure your files using MVC or to use RequireJS. But if you're building a rich web app with many different views, then definitely yes!
The app we'll create
To illustrate how to organize your MVC code using RequireJS, we'll create a very simple app with 2 views:
- The first view will display a list of users (represented by a
nameattribute), - The second view will allow you to add a user.
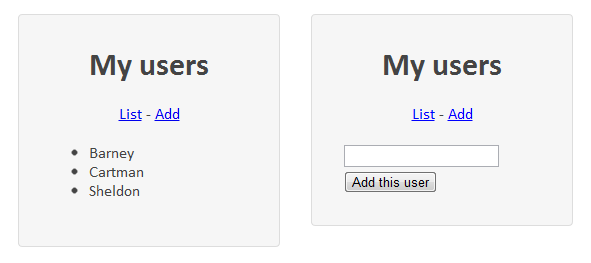
The business logic is obviously super simple so you can focus on understanding what's really important here: structuring your code. And since it's that simple, I strongly recommend that you really try to do it in parallel of reading this tutorial. It won't take long, and if you have never done modular programming or used RequireJS before, coding this example will really help you become a better programmer. Seriously, it's worth it, you should do it.
HTML and CSS files
Here is the HTML markup we'll use for this example:
<!DOCTYPE html>
<html>
  <head>
    <meta charset="utf-8" />
    <title>A simple MVC structure</title>
    <link rel="stylesheet" href="css/style.css" />
  </head>
  <body>
    <div id="container">
      <h1>My users</h1>
      <nav><a href="#list">List</a> - <a href="#add">Add</a></nav>
      <div id="app"></div>
    </div>
    <script data-main="js/main" src="js/require.js"></script>
  </body>
</html>
The navigation in our app will be the links of the nav menu which will remain present on each page of the app, and all the magic of the MVC application will happen in the #app div. We also included RequireJS (which you can grab here) at the bottom of the body, and you can notice a data attribute on the script tag: data-main="js/main". This value is used by RequireJS as the entry point of the entire application.
Let's also add just a little bit of basic styling:
#container {
  font-family: Calibri, Helvetica, serif;
  color: #444;
  width: 200px;
  margin: 100px auto 0;
  padding: 30px;
  border: 1px solid #ddd;
  background: #f6f6f6;
  -webkit-border-radius: 4px;
     -moz-border-radius: 4px;
          border-radius: 4px;
}

h1, nav {
  text-align: center;
  margin: 0 0 20px;
}
OOP reminder: What is a module?
In JavaScript Object-Oriented Programming, there is a very common design pattern called Module Pattern. It is used to encapsulate methods and attributes in objects (which are the "modules") to avoid polluting the global namespace. It is also used to kind of simulate classes from other OOP languages like Java or PHP. This is how you would define a simple MyMath module in our main.js file:
var MyMath = (function () {
  // Put your private variables and functions here

  return {
    // Here are the public methods
    add: function (a, b) {
      return a + b
    },
  }
})()

console.log(MyMath.add(1, 2))
Public methods are declared using the object literal notation, which is not very convenient. You can alternatively use the Revealing Module Pattern, which returns private attributes and methods:
var MyMath = (function () {
  // With this pattern you can use the usual function notation:

  function add(a, b) {
    return a + b
  }

  return {
    add: add, // But don't forget to declare it in the returned object!
  }
})()

console.log(MyMath.add(1, 2))
I will be using the Revealing Module Pattern in the rest of this article.
RequireJS
Defining a module with RequireJS
In the last section we declared a module in a variable to call it later. This is just one way to declare modules. We're now going to see a (barely!) different method used by RequireJS. The purpose of RequireJS is to split our JavaScript files for a better maintainability, so let's create a MyMath.js file to define our MyMath module in the same folder as main.js:
define(function () {
  function add(a, b) {
    return a + b
  }

  return {
    add: add,
  }
})
Instead of declaring a variable, we just put the module as a parameter of the define function. This function is provided by RequireJS and will make our module accessible from the outside.
Requiring a module from the main file
Let's go back to our main.js file. RequireJS provides a second function called require that we're going to use to call our MyMath module. Here is what main.js now looks like:
require(['MyMath'], function (MyMath) {
  console.log(MyMath.add(1, 2))
})
The call to MyMath is now wrapped in require, which takes 2 parameters:
- An array of modules we want to load, declared with their path relative to the entry point (remember the
data-mainattribute) and without the.jsextension, - A function to call once these dependencies are loaded. The modules will be passed as parameters of this function so you can simply name those parameters with the same modules names.
You can now reload the page and... congratulations! You just called a method from an other file! Yes, that was super easy and you're now ready for the big scary MVC architecture (which works exactly like the module definition you just did, so be sure you'll be doing great!).
The MVC structure
Let's start with the part I'm sure you love: creating all the folders and files of our project. We want to use Models to represent data, the business logic will be handled by Controllers, and those controllers will call specific Views to render pages. So guess what? We need 3 folders: Models, Controllers and Views. Considering our simple app case, we'll have 2 controllers, 2 views and 1 model.
Our JavaScript folder now looks like this:
ControllersAddController.jsListController.jsModelsUser.jsViewsAddView.jsListView.jsmain.jsrequire.js
Got the structure ready? Great! Let's start implementing the simplest part: the Model.
The Model: User.js
In this example, a User will be a simple class with a name attribute:
define(function () {
  function User(name) {
    this.name = name || 'Default name'
  }

  return User
})
If we now come back to our main.js file, we can declare the dependency to User in the require method, and create a set of users for the purpose of this example:
require(['Models/User'], function (User) {
  var users = [new User('Barney'), new User('Cartman'), new User('Sheldon')]

  for (var i = 0, len = users.length; i < len; i++) {
    console.log(users[i].name)
  }

  localStorage.users = JSON.stringify(users)
})
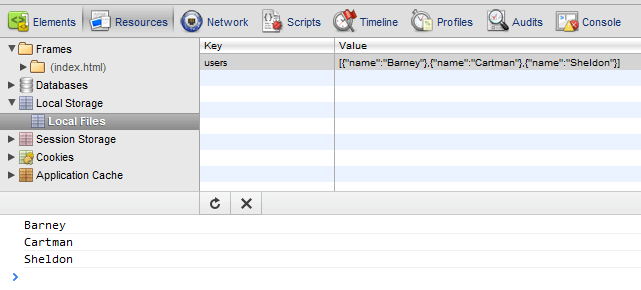
We then serialize in JSON the users array and store it in the HTML5 local storage to make it accessible just like a database:
Displaying the users list
It's time to display those users in the app interface! We'll have to work with ListController.js and ListView.js to do that. Those 2 components are obviously related, and they'll be linked somehow. There are many ways we can do that, and to keep this example simple, here is what I suggest: The ListView will have a render method and our ListController will simply get the users from the local storage and call ListView's render method by passing the users as a parameter. So obviously, ListController needs ListView as a dependency.
Just like with require, you can pass an array of dependencies to define if the module relies on other modules. Let's also create a start method (or any other name that makes sense to you - like run or main), to put the main behavior of the controller in it:
define(['Views/ListView'], function (ListView) {
  function start() {
    var users = JSON.parse(localStorage.users)
    ListView.render({ users: users })
  }

  return {
    start: start,
  }
})
Here we deserialize the users from the local storage and pass it to render as an object. Now, all we have to do is implementing a render method in ListView.js:
define(function () {
  function render(parameters) {
    var appDiv = document.getElementById('app')

    var users = parameters.users

    var html = '<ul>'
    for (var i = 0, len = users.length; i < len; i++) {
      html += '<li>' + users[i].name + '</li>'
    }
    html += '</ul>'

    appDiv.innerHTML = html
  }

  return {
    render: render,
  }
})
This method simply loops on our users to concatenate them in an HTML string we inject in the #app element.
Now, all we need to do is to "run" our ListController module. To do that let's declare it as a dependency of require in our main.js file, and call ListController.start():
require(['Models/User', 'Controllers/ListController'], function (User, ListController) {
  var users = [new User('Barney'), new User('Cartman'), new User('Sheldon')]

  localStorage.users = JSON.stringify(users)

  ListController.start()
})
You can now refresh your page to get this wonderful list of users:
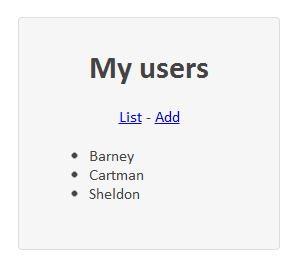
Woooaaaah, it works! Congratulations if you coded this too!
Adding a user
We now want to be able to add users to our list. We'll display a simple text input and a button, with an event handler when the button is clicked to add the user to the local storage. Let's start with AddController, just like we did in the previous section. This file will be pretty simple since we don't have any parameter to give to the view. Here is AddController.js:
define(['Views/AddView'], function (AddView) {
  function start() {
    AddView.render()
  }

  return {
    start: start,
  }
})
And its corresponding view:
define(function () {
  function render(parameters) {
    var appDiv = document.getElementById('app')
    appDiv.innerHTML = '<input id="user-name" /><button id="add">Add this user</button>'
  }

  return {
    render: render,
  }
})
You can now declare AddController as a dependency in your main file and call its start method to successfully get the expected view:
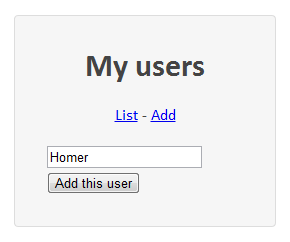
But since we don't have any event bind on the button yet, this view is not very useful... Let's work on that. I have a question for you: Where should we put the event logic for this event? In the view? The controller? If we put it in the view it would be the right place to add events listeners, but putting the business logic in a view would be a bad practice. Putting the event logic in the controller seems to be a better idea, even if it's not perfect because we don't want to see any div ID in there, which belong to the view.
As I said, let's put all the event logic in the controller. We can create a bindEvents function in AddController and call it after the view has finished rendering the HTML:
define(['Views/AddView', 'Models/User'], function (AddView, User) {
  function start() {
    AddView.render()
    bindEvents()
  }

  function bindEvents() {
    document.getElementById('add').addEventListener(
      'click',
      function () {
        var users = JSON.parse(localStorage.users)
        var userName = document.getElementById('user-name').value
        users.push(new User(userName))
        localStorage.users = JSON.stringify(users)
        require(['Controllers/ListController'], function (ListController) {
          ListController.start()
        })
      },
      false
    )
  }

  return {
    start: start,
  }
})
In bindEvents, we simply add an event listener for clicks on the #add button (feel free to use your own function to deal with IE's attachEvent - or just use jQuery). When the button is clicked, we get the users string from the local storage, deserialize it to get the array, push a new user with the name contained in the #user-name input field, and put the updated users array back to the local storage. After that we finally require the ListController to execute its start method so we can see the result:
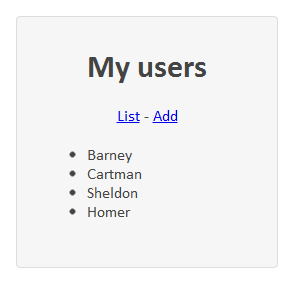
Brilliant! It's time for you to take a break, you've done a very good job if you're still doing this example with me. You deserve a cup of coffee before we continue!
Navigation between views with routes
Okay back to work. Our little app is pretty cool but it really sucks that we still cannot navigate between views to add more users. What is missing is a routing system. If you've worked with server-side MVC frameworks before, you're probably familiar with this. Each URL leads to a different view. However here we're client-side and it's slightly different. JavaScript single page interfaces like this one use the hash of the URL to navigate between different parts of the app. In our case, we want to be able to reach the 2 different views when hitting those URLs:
http://yourlocalhostpath/#listhttp://yourlocalhostpath/#add
This will make each page of our app bookmarkable and easily reachable.
Browsers compatibility and functioning
Managing history and hash navigation can be very painful if you need a good compatibility with old browsers. Depending on the browsers you aim to support here are different solution you can consider:
- Only the most advanced browsers: HTML5 history management,
- Most of the current browsers: HTML5 hashchange event,
- Old browsers: Simple manual monitoring of hash changes,
- Very old browsers: Manual monitoring + iframe hack.
In our case we will do the simple manual monitoring, which is pretty easy to implement. All we need to do is checking if the hash changed every n milliseconds, and fire some function if a change is detected.
The routes and the main routing loop
Let's create a Router.js file next to main.js to manage the routing logic. In this file we need a way to declare our routes and the default one if none is specified in the URL. We can for instance use a simple array of route objects that contain a hash and the corresponding controller we want to load. We also need a defaultRoute if no hash is present in the URL:
define(function () {
  var routes = [
    { hash: '#list', controller: 'ListController' },
    { hash: '#add', controller: 'AddController' },
  ]
  var defaultRoute = '#list'
  var currentHash = ''

  function startRouting() {
    window.location.hash = window.location.hash || defaultRoute
    setInterval(hashCheck, 100)
  }

  return {
    startRouting: startRouting,
  }
})
When startRouting will be called, it will set the default hash value in the URL, and will start a repetition of calls to hashCheck that we haven't implemented yet. The currentHash variable is used to store the current value of the hash.
Check for hash changes
And here is hashCheck, the function called every 100 milliseconds:
function hashCheck() {
  if (window.location.hash != currentHash) {
    for (var i = 0, currentRoute; (currentRoute = routes[i++]); ) {
      if (window.location.hash == currentRoute.hash) loadController(currentRoute.controller)
    }
    currentHash = window.location.hash
  }
}
hashCheck simply checks if the hash has changed, and if it matches one of the routes, calls loadController with the corresponding controller name.
Loading the right controller
Finally, loadController just performs a call to require to load the controller's module and execute its start function:
function loadController(controllerName) {
  require(['Controllers/' + controllerName], function (controller) {
    controller.start()
  })
}
So the final Router.js file looks like this:
define(function () {
  var routes = [
    { hash: '#list', controller: 'ListController' },
    { hash: '#add', controller: 'AddController' },
  ]
  var defaultRoute = '#list'
  var currentHash = ''

  function startRouting() {
    window.location.hash = window.location.hash || defaultRoute
    setInterval(hashCheck, 100)
  }

  function hashCheck() {
    if (window.location.hash != currentHash) {
      for (var i = 0, currentRoute; (currentRoute = routes[i++]); ) {
        if (window.location.hash == currentRoute.hash) loadController(currentRoute.controller)
      }
      currentHash = window.location.hash
    }
  }

  function loadController(controllerName) {
    require(['Controllers/' + controllerName], function (controller) {
      controller.start()
    })
  }

  return {
    startRouting: startRouting,
  }
})
Using the new routing system
Now we can require this module from our main file and call startRouting:
require(['Models/User', 'Router'], function (User, Router) {
  var users = [new User('Barney'), new User('Cartman'), new User('Sheldon')]

  localStorage.users = JSON.stringify(users)

  Router.startRouting()
})
To navigate in our app from a controller to another, we can just replace the current window.hash with the new controller's hash route. In our case we still manually load the ListController in AddController instead of using our new routing system:
require(['Controllers/ListController'], function (ListController) {
  ListController.start()
})
Let's replace those 3 lines with a simple hash update:
window.location.hash = '#list'And this is it! Our app now has a functional routing system! You can navigate from a view to another, come back, do whatever you want with the hash in the URL, it will keep loading the right controller if it matches the routes declared in the router. Sweet!